

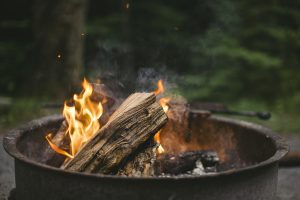
Ah, the great outdoors. So peaceful and relaxing. Basking in the serenity of nature, feeling a cool raindrop on your face, letting the leaves of a fern slide between your fingers as you gently sway back and forth in your hammock… listening to the crescendoing whines of your children as they tip your hammock and bemoan the fact that they are SO HUNGRY.
Ah, the great outdoors. Making everyone hungrier since the beginning of time. Camping can be a lot of work, especially with kids that have stomachs deeper than an abyss. Why not take a little bit of the work out of camping and give a little bit of time in nature back to yourself by prepping some meals ahead of your trip. Thus, while you’re out adventuring, you can do less cooking and s’more relaxing with your family.
To get you started prepping for your next adventure, here are some of my favorite make-ahead camping meals* for breakfast, lunch, dinner, and dessert. Adventure is trout there!**
*The baking recipes are amended for high altitude since Flagstaff is at 7000’.
**My husband claimed this was way too cheesy to include, and he’s the master of dad jokes. I included it anyway.
BREAKFAST
Breakfast Burritos
A protein-packed, all-in-one, portable breakfast that will hopefully keep your tiny, hungry mischief-makers satiated until lunch. And, as a bonus, if you also make the walking tacos from the recipe listed below, you can use your topping ingredients for more than one meal.
Ingredients (to feed four):
2-3 medium potatoes, cubed
½ lb. bacon or ground sausage
1 large yellow onion, diced
2-3 cloves garlic, minced
4 eggs
1 Tbsp. milk
1 c. shredded cheese (Colby jack, cheddar, pepper jack – you choose your favorite!)
4 large tortillas
Sour cream
Salsa
1 avocado
Salt and pepper to taste
Directions:
- Rinse the cubed potatoes appropriately for their starch content (for example, Idaho potatoes which are high in starch need extra rinsing so they don’t burn in the skillet). Brown the potatoes in a frying pan or cast iron with some oil, salt, and pepper. Transfer pan to the oven at 400°F to finish cooking (they’re done when they are soft on the inside and crispy on the outside).
- Cook either the sausage on the stovetop or bake the bacon in the oven (I usually do 380°F for about 18 minutes). Dice bacon once it is cooked.
- Sauté the onion until it is clear, add garlic and cook until fragrant. Add a little salt and pepper to taste.
- Crack the eggs into a bowl, and add enough milk to achieve the fluffy consistency you prefer (this is usually 1 Tbsp for me). Beat the eggs and add to a warm, buttered pan. Cook low and slow until fluffy and done all the way through. Add salt and pepper to taste.
- Combine the potatoes, onions and garlic, meat (either cooked ground sausage or cooked bacon), and eggs into one pan. Add plenty of shredded cheese (about 1 cup for 4 burritos), and mix together until cheese is melted.
- Add the mixture to the tortillas (about ⅔ – 1 cup per tortilla). You can add salsa and sour cream now, or wait and have each person add as much as they want later.
- Wrap up the filled tortillas in the burrito style, and wrap each burrito in foil.
- Freeze the burritos until it’s time to pack them in the cooler.
- While camping, pull the burritos out of the cooler and toss directly into the fire near hot coals or into a pan on your camp stove. Rotate every now and then until heated through.
- Unwrap your burrito, add additional toppings (salsa, sour cream, avocado), and enjoy hot!
High-altitude Banana Pecan Muffins
For the absolutely no-fuss breakfast that you can literally toss at your kids and be done with, these banana muffins are a great choice. If you decide to warm them up over the campfire before serving, then you may want to refrain from pitching these baseball-style to your kids unless they are wearing an oven mitt! This recipe is made with slight adaptations from the ever-so-tasty recipe by Mountain Mama Cooks (original recipe here).
Ingredients:
1 c. all-purpose flour
⅔ c. whole wheat pastry flour (if you don’t have this, see note below for substituting a mixture of all-purpose flour and cornstarch)
¾ tsp. baking soda
¾ tsp. ground cinnamon
¼ tsp. salt
¾ c. granulated sugar
2 eggs
½ c. vegetable oil
3-4 ripe bananas (peeled and mashed)
3 Tbsp. sour cream
1 tsp. vanilla extract
⅔ c. pecans, broken into smaller pieces
Directions:
- Preheat oven to 350°F.
- Use butter or cooking spray to grease a muffin pan if not using paper muffin liners.
- In a bowl, mix together both flours, baking soda, cinnamon, and salt.
- If you don’t have pastry flour on hand, you can substitute a mixture of all-purpose flour and corn starch. The standard substitution is for every cup of pastry flour, substitute one cup of all-purpose flour with two tablespoons removed, then add back in two tablespoons of corn starch. In this case, that would be substituting ⅔ cup minus 1½ tablespoons of all-purpose flour for the whole wheat pastry flour, then adding back in 1½ tablespoons of corn starch.
- Grab a large bowl and add sugar, eggs, and oil. Beat until it becomes light and airy. It will not look fluffy so much as runny.
- Stir in the mashed bananas, vanilla, and sour cream.
- Add in the dry ingredients until just mixed, then mix in the pecans (nuts are optional, of course). I like using pecans instead of walnuts because it gives it a slightly sweeter, more breakfast-y feel.
- Fill each muffin cup with batter until approximately ⅔ full. Bake 12-13 minutes or until a toothpick inserted into the muffins comes out clean.
- Remove muffins from the oven, let cool completely, and store in an airtight container to be tossed in your food bin for your camping trip!
- Eat cold or serve warm. I like to heat my muffins up over a morning fire or on a camp stove. It’s easy to wrap them up in foil, toss over the fire, then unwrap and eat warm with a fork.
LUNCH
No-bake Energy Bites
If you get busy looking through your binoculars and forget to look at your watch, just toss a few of these energy bites into your pack, and you can still set off quickly to squeeze in a day hike before nap time. They are packed with protein to stave off hunger, and they are ridiculously easy to make ahead of time. You can even task your kids with making these bites because they are so simple.
Ingredients:
2 c. rolled oats
½ c. ground flaxseed
½ c. honey
1 c. peanut butter
1½ tsp. vanilla
3 Tbsp. coconut oil
½ c. semi-sweet chocolate chips
Directions:
- Grab a big bowl and mix together the oats and flaxseed.
- Add in the honey, peanut butter, and vanilla.
- Warm the coconut oil slightly – not enough that it melts, but enough that it more easily blends with the other ingredients. Add coconut oil to the bowl and mix the ingredients together.
- Add in chocolate chips. Extra points if you can get your kids to mix and mash them in with their hands (if you don’t have them making this recipe by themselves already!).
- Roll into bite-sized balls and refrigerate to help them maintain their shape (they do not have to stay refrigerated).
- Enjoy when hunger strikes!
Other Simple Lunch Ideas
Include these items for additional quick snack bites:
- Fruit
- Apples, pears, and clementines come in nature’s packaging and are a big hit with kids. Blueberries and grapes are easy to toss in a bag. If you have room in your cooler, you can pre-cut fruits like cantaloupe, watermelon, and pineapple for easy serving later.
- Ants on a log
- Celery layered with peanut butter and raisins on top.
- Quick wraps
- Grab a tortilla, slather it with hummus, and add sliced avocados, everything bagel seasoning, and your favorite lunch meat
- Sandwiches
- Good ol’ PB&J (or PB & honey) are great to eat at any temperature (no worries if they get hot in your backpack), so don’t feel like you have to get fancy
- Cheese sticks
- Trail mix
DINNER
Campfire Mac n’ Cheese
A family classic, and a good crowd-pleaser. If you want more than just mac n’ cheese as the main event, you can also serve with hot dogs roasted over the fire. In case you don’t have the time to prep your own cheese sauce, grab a family-sized box of pre-packaged macaroni and cheese – just make sure to buy the kind with the liquid, squeezy cheese (like Velveeta or Kraft Deluxe). Use foil pans for effortless cooking and cleanup.
Ingredients (to feed four):
8 oz. (half a box) elbow macaroni
½ lb. Velveeta cheese, cubed
Salt and pepper to taste
½ tsp. garlic powder
4 Tbsp. cold butter, cubed
1 c. shredded cheese (cheddar, Colby jack, gouda – pick your favorite!)
Directions:
- Cook pasta according to the package directions. Drain.
- Stir in cubed Velveeta cheese until melted and spread evenly over macaroni.
- Add salt and pepper to taste. Add garlic powder for a bit of extra flavor. Stir into macaroni.
- Spray foil pans with nonstick cooking spray, and pour pasta into the pans. You can use one large foil pan for the whole family, or smaller foil pans for each person.
- Add butter cubes to each foil pan.
- Sprinkle shredded cheese on top. For individual pans, each person can add their favorite shredded cheese and then write their name on top of their pan.
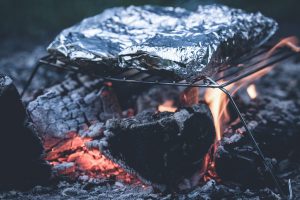
- Wrap pans tightly with foil, leaving some extra to create a rolled foil handle on top so the pans are easy to grab out of the fire.
- Refrigerate until it’s time to pack them in the cooler.
- When out camping, place pans wrapped in foil directly onto the coals of the fire until the mac n’ cheese is hot and bubbly!
Walking Tacos
Tacos can be messy, especially for people like me who don’t know when to stop adding toppings. Walking tacos help with the mess by being portable and contained, so instead of feeding the wildlife, you can just feed your family. Biggest bonus: toppings make this meal ultra-customizable for picky eaters. If you made the breakfast burrito recipe listed above, you can reuse toppings for your tacos! It’s a win-win!
Ingredients (to feed four):
1 lb. ground beef
1 packet of taco or chili seasoning
4 individual bags of Doritos or Fritos + extra for the hungry bears in your family
Shredded jack cheese or queso
Shredded lettuce or cabbage
Chopped green onions
1 can Rotel
1 can corn
1 can sliced black olives
Salsa
Sour cream
Avocado
THE LIST COULD GO ON – add any other toppings you like
Directions:
- At home, add ground beef to a skillet to begin browning.
- While the meat cooks, chop lettuce or cabbage and green onions. Place in small containers or baggies that will fit in your cooler (we use these reusable silicone Stasher bags).
- You can also open up the canned goods and place in other containers if you don’t want to deal with opening cans while camping. Otherwise, remember to bring a few extra containers for the leftovers that aren’t eaten!
- I recommend leaving the avocado intact until you are at your campsite as avocados turn brown quickly after cutting.
- Once the meat is cooked through, drain the excess fat. Add in the taco or chili seasoning and stir. Let cool, and then transfer to a container or baggie, and store in the refrigerator until it’s time to put it in the cooler.
- At your campsite, warm up the meat over the campfire or on a camp stove by adding a little bit of water until it’s heated through. If you chose to use queso, you can stir it into the meat prior to heating.
- Have each person open up their own bag of Doritos or Fritos and start layering the meat and all the toppings in! Some people like to crush up their chips before adding in goodies so it’s easier to get a bite on a fork. Mix it all up and chow down!
DESSERT
Campfire Hollowed-Orange Cake
Imagine taking a deep breath and smelling the fresh pine trees, wood smoke from your campfire, and freshly baked cake. Wait, what? Do these scents go together? Never in my life have I come across a candle that mixes those scents, but it’s because candle makers never envisioned fresh cake in the wilderness. Well, they should start dreaming bigger because it’s totally achievable and completely delicious!
Can you make batter ahead of time? The short answer is yes. Pre-mixing batter won’t much affect the way your cake turns out when using cake mix because it has additives that give it stability. Making batter from scratch, on the other hand, will not include those additives. The chemical reactions between leaveners and acids, and the air added from whipping your homemade batter won’t be preserved well if the batter is stored instead of baked right away. Though let’s be honest, cooking cake over a campfire isn’t an exact science anyway. Heat will differ depending on where your orange cake is placed in the fire, and how hot your campfire coals are. Either way, give yourself a deserved break and use a packaged cake mix because this is one time that it will likely turn out better than homemade batter! You can choose any flavor cake mix. I use chocolate because chocolate and oranges just go together like peas and carrots.
Ingredients:
1 box chocolate cake mix (I like to use this Betty Crocker Supermoist Chocolate Cake one)
+ Ingredients on cake mix label (usually eggs and oil, sometimes milk)
+ All-purpose flour (usually a couple extra tablespoons are needed to follow high-altitude recipes)
4-8 oranges (enough for the whole family and then some because there is batter for plenty of orange cakes)
2 Hershey’s chocolate bars
Directions:
- Plan when you are going to tackle this. If you are only refrigerating your batter before tossing it into the cooler, try to make the batter the night before you leave for your camping trip. If you aren’t going to eat your cake on the very first night of your trip, then you can freeze your batter for up to a few days. On your trip, it will slowly defrost in your cooler until you’re ready to use it.
- Mix up cake batter according to high-altitude directions on box.
- Pour the batter into a durable, double-zippered baggie. Store in fridge or place in freezer until it’s time to pack in the cooler.
- At your campsite, give your kids a fun, messy activity by having them hollow out the oranges. If they aren’t old enough to use a knife yet, first cut an approximately 2-3” circle (large enough to get in there with a spoon) out of the top of the orange. Hand the orange and a spoon (advantage to the person who has a grapefruit spoon) to your child, and let them hollow out the “guts”. You can put all of the orange’s insides into a bowl for everyone to dig into while they’re waiting for cake to bake.
- Give the batter a good mixing massage in the bag. Cut off a bottom corner of the bag, and squeeze an equal amount of batter into each of the prepped oranges. Be careful not to fill too full (no more than ⅔ full), or the cake that oozes out the top will likely burn.
- Take a couple of squares of a Hershey bar, and break them up into smaller pieces. Drop these pieces into a batter-filled orange. This will give extra chocolatey-ness and moisture to your treat. Do this for each orange.
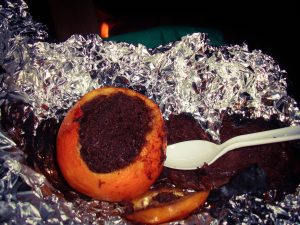
- Place the caps back on the oranges. Wrap each one in foil while making sure to leave a little extra foil at the top to roll into a handle. This helps to always know which way is up and to prevent cake from spilling out before cooking.
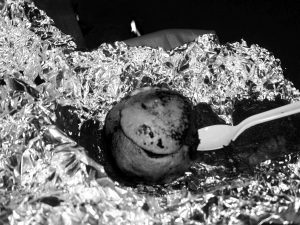
A rare sighting of a hollow orange cake smile. Maybe they aren’t so hollow inside, after all. - Using tongs, place the foil-wrapped oranges into the coals of your campfire. The orange cakes will likely need at least 10 minutes to bake, but this depends on how hot the campfire is burning. Rotate the oranges every few minutes to cook the cakes evenly.
- Using tongs, remove the orange cakes from the fire, take off the caps, and enjoy hot!
Elote
If you would like a slightly healthier dessert, or at least more fiber for a day, try something more savory, like elote (roasted sweet corn). This recipe is adapted from a recipe published on The Kitchn.
Ingredients (to feed four):
4 ears of corn
½ c. mayonnaise
2 Tbsp. chili powder (or to taste)
1 Tbsp. cumin (or to taste)
¼ c. melted butter
½ c. Cotija cheese (or you can use parmesan in a pinch)
½ lime, cut into four wedges
Salt to taste
Directions:
- At home, mix mayonnaise, chili powder, and cumin. Place mixture into a container and refrigerate until it’s time to pack it in the cooler.
- At your campsite, determine your cooking method. If cooking on a camp grill, you can leave the corn in the husks. If cooking over the fire, shuck the corn. Then either wrap each ear in foil and place on hot coals, or put on roasting sticks and roast over the fire.
- Cook corn 10-15 minutes, until it is hot and bright yellow (or until husks are blackened).
- When the corn is done cooking, remove husks (if still on), and roll corn in melted butter.
- Slather with the pre-made mayonnaise mixture, then sprinkle on salt and cheese to taste. Squeeze lime wedge on your ear (no not your ear, the ear of corn!).
- ENJOY HOT!


")
